
Key Takeaways
- Monthly Pump Gear Audit: Regularly inspect valves, tubing, and flanges. Replace worn silicone parts to maintain suction efficiency and prevent supply dips.
- Flange Fit & Comfort: Re-measure your breast shield monthly using the “shoe comparison” to prevent nipple pain, clogs, and let-down inhibition.
- Schedule & Technique Optimization: Adjust pumping frequency as your baby grows, use power pumping for supply boosts, and mimic a baby’s sucking rhythm to maximize milk output.
Optimize Your Exclusive Pumping Routine Monthly
You’ve spent weeks tethered to a machine while the rest of the world sleeps. If your output is mysteriously dipping, please know it isn't your fault. According to community best practices, sudden supply plateaus are usually caused by an outdated routine rather than your body failing.
Whether you are strictly following an exclusive pumping schedule newborn plan or managing a hybrid nursing pumping schedule, your equipment and hormones constantly shift. Ignoring the three main red flags—unexplained supply drops, new physical discomfort, and silicone part wear—forces your pump to work twice as hard for half the milk.
Instead of enduring longer sessions, take time to optimize your exclusive pumping routine monthly. Performing a simple 15-minute monthly audit lets you reset your gear, troubleshoot those frustrating plateaus, and finally get back to your life.
The "Toothbrush" Rule for Pump Parts: How Worn Silicone Stealthily Kills Your Milk Supply
You might scrub your gear daily, but hygiene won't fix silicone elasticity fatigue. Just like a toothbrush wears down, the flexible pieces inside your pump lose their snap after continuous stretching. These aren't just parts that need cleaning—they are parts that need discarding.
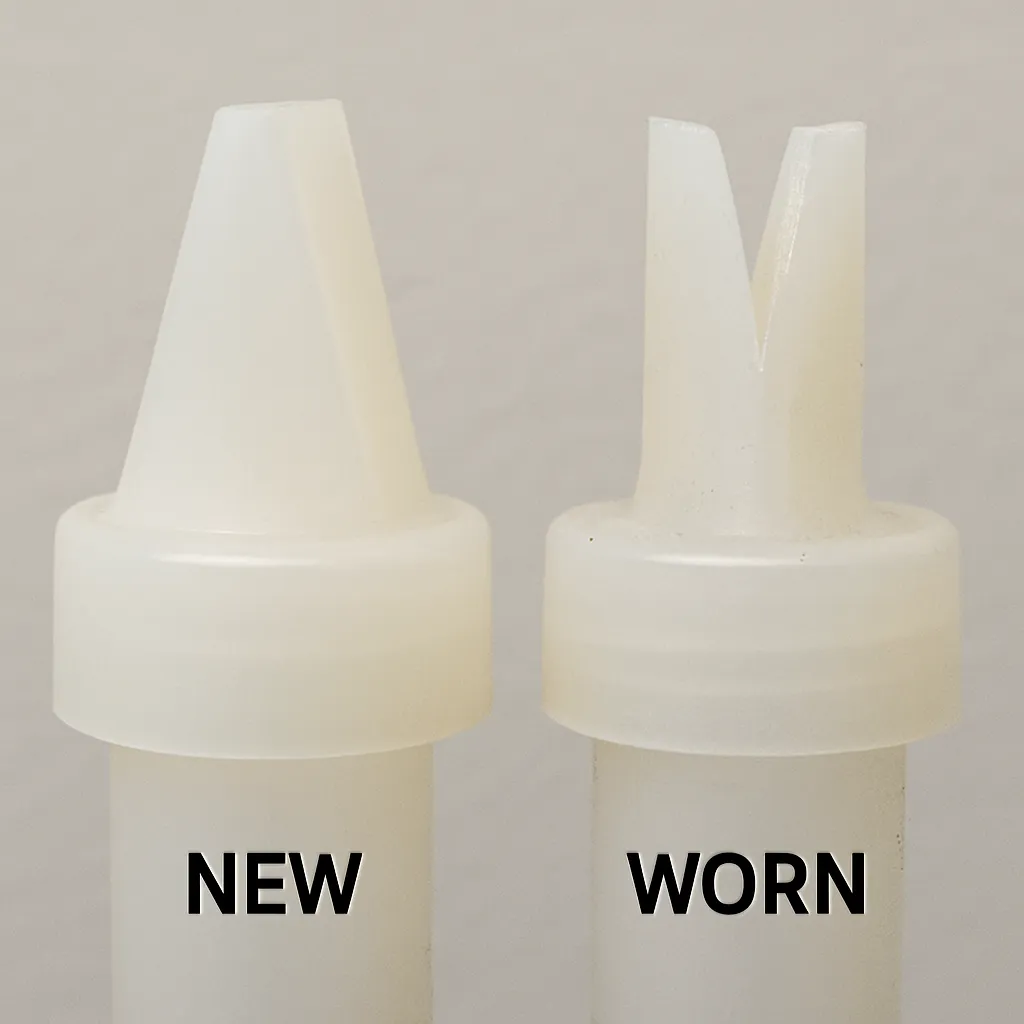
Knowing when to replace breast pump valves prevents hidden vacuum efficiency loss. If your machine is weakly tugging, perform the "gap test." Look closely at the bottom slit; if it rests slightly open instead of pinching shut, your motor is working harder for half the milk.
Setting a recurring calendar reminder based on your pumping frequency takes the guesswork out of this. Run through this quick monthly breast pump maintenance checklist to audit your hardware:
- Inspect duckbills for gaps.
- Examine backflow protectors for stretching.
- Check tubing for moisture.
Rescuing your suction with fresh valves is critical, but examining the shell against your skin matters equally. Your body changes alongside your equipment, meaning your flange size isn't permanent. Using the "shoe comparison" helps you identify poor fit to quickly end nipple pain and clogs.
Why Your Flange Size Isn't Permanent: Using the "Shoe Comparison" to End Nipple Pain and Clogs
Most pumpers assume their measurements are locked in, but your nipple diameter is actually a moving target. Think of this like buying shoes; what fits perfectly in month one might pinch painfully by month three due to tissue swelling and elasticity changes. Re-measuring your fit every thirty days guarantees breast shield sizing for maximum efficiency.
Ignoring these monthly changes often triggers a friction-inhibited let-down, where subtle pain actively stops your body from releasing milk. Whether you use silicone vs plastic breast pump flanges, a tight tunnel rubbing against your skin restricts flow. Spotting white nipples or clicking sounds early is absolutely vital for preventing mastitis while exclusively pumping.
![A simple illustration showing a nipple centered in a flange with 1-2mm of space around it versus a nipple rubbing against the tunnel walls.]
True physical comfort acts as the biological green light telling your brain to empty the breast quickly. Once your hardware fits flawlessly and the milk flows without friction, your next priority is adapting your daily session frequency to match your baby's growth.
Syncing Your Schedule to Baby’s Growth: Mastering the Exclusive Pumping Timeline from Newborn to 6 Months
With your hardware fitting perfectly, it is time to optimize your body’s “software.” You do not have to pump eight times a day forever. Every parent has a "Magic Number"—the exact daily sessions needed to maintain volume based on breast storage capacity. As this capacity expands, you can safely space out sessions.
Transitioning your routine prevents burnout. An exclusive pumping schedule by month shifts as your supply regulates, letting you drop a pump safely without triggering mastitis:
- Month 1: 8–10 sessions (Establishing supply)
- Month 3: 5–6 sessions (A typical pumping schedule 3 months postpartum)
- Month 6: 4–5 sessions (Long-term maintenance)
- Power Pumping: 20 minutes on, 10 rest, 10 on, 10 rest, 10 on
Unexpected volume changes still happen, particularly when your cycle returns. A sudden milk supply drop during menstruation occurs because shifting calcium levels temporarily suppress prolactin—your primary milk-making hormone. When this monthly glitch happens, substituting one regular session with a power pumping schedule for supply mimics a baby’s growth spurt, naturally coaxing hormones back up.
Finding your rhythm means adjusting to your body's changing timeline rather than stressing over the clock. Once your daily frequency stabilizes, you can start shaving minutes off those actual sessions by mimicking a hungry baby to maximize ounces per minute.
Beyond the "High Suction" Myth: Mimicking a Hungry Baby to Maximize Ounces per Minute
Many tired parents instinctively crank up their hospital grade breast pump suction, hoping a stronger pull equals faster emptying. However, pain inhibits your let-down reflex. To work smarter, separate "cycle speed" (how fast a baby gulps) from "vacuum strength" (how hard they pull). Mimic a hungry newborn: start fast and light to trigger flow, then shift to slow and deep.
Watching your milk instead of the clock transforms your routine. When wondering how long should a pumping session last, look for when the spray slows to a trickle rather than setting a rigid timer. If flow stops early, toggle back to the fast cycle mode to trigger another let-down.
![A simple hand graphic showing the 'C-hold' position for manual breast compression during a pumping session.]
Even with perfect settings, machines alone leave milk behind. You can maximize milk output with hands-on pumping by gently compressing breast tissue while the motor works. Using a "C-hold" pushes milk toward the flange, yielding up to 20% more volume. Mastering these physical techniques helps transition your routine from survival mode to sustainable pumping success.
Your 30-Day EP Action Plan: How to Transition from Survival Mode to Sustainable Pumping Success
Instead of feeling stuck when output dips, you can now optimize your exclusive pumping routine monthly by working smarter, not harder. Commit today to one hardware fix—like replacing worn valves—and one software tweak, whether adjusting suction or planning your eventual exclusive pumping weaning process. Setting a simple monthly goal prevents burnout and keeps you in control of your schedule.
For ultimate peace of mind, verify your hard-earned stash against a standard breast milk storage duration chart. You now have the tools to troubleshoot confidently. Take a deep breath, reset mentally, and make your next thirty days of pumping work for you.
See if you’re covered in under a minute!